Home Blog

Google Consent Mode

0

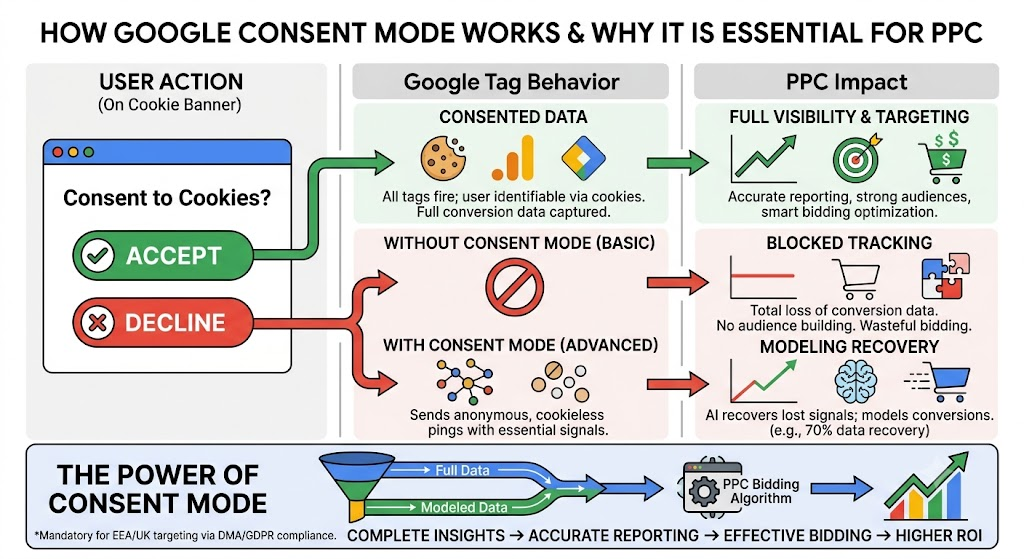
Google Consent Mode is a framework that allows your website’s Google tags (like Google Ads and Google Analytics 4) to dynamically adjust their behavior based on the privacy choices your visitors make on your cookie banner.

Instead of a hard “on/off” switch for tracking, Consent Mode acts as a smart valve. It tells Google whether it has permission to store cookies for advertising or analytics. If a user says “No” to tracking, Consent Mode ensures your website respects their privacy while keeping your marketing from going completely blind.
Why It Is Essential for PPC Conversion Tracking

If you are running pay-per-click (PPC) campaigns—especially on Google Ads—failing to use Consent Mode is like throwing away part of your ad budget. It is vital for three main reasons:

1. It Recovers “Lost” Conversion Data (Via Machine Learning)

When a user rejects cookies on a traditional setup, the tracking script is blocked entirely. If that user later buys something, Google Ads has zero visibility into it. You paid for the click, but you get no credit for the sale.

With Advanced Consent Mode, when a user rejects cookies, the tags don’t just shut down. Instead, they send anonymous, cookieless pings to Google. These pings contain zero personal data but communicate basic signals (like a timestamp, what device was used, and if a conversion happened).

  • The Magic: Google uses AI to compare the behavior of your consented users with these cookieless pings. It then models the missing data, recovering up to 70% of the conversions you would have otherwise lost.

2. It Feeds the Smart Bidding Algorithm

Modern PPC relies heavily on automated “Smart Bidding” (like Maximize Conversions or Target ROAS). These algorithms require a steady stream of conversion data to understand which keywords, audiences, and placements actually drive revenue.

  • The Risk: If 30% of your users reject cookies and you aren’t using Consent Mode, your reported conversions drop by 30%.
  • The Consequence: The bidding algorithm assumes your campaign is performing poorly. It will underbid, restrict your traffic, or shift budget away from keywords that are actually highly profitable, causing your overall ROI to plummet.

3. It is Mandatory for Targeting and Audience Building

Due to strict regulations like Europe’s GDPR and the Digital Markets Act (DMA), Google Consent Mode v2 is strictly required if you want to target users in regions like the European Economic Area (EEA) and the UK.

  • Without it, Google will aggressively restrict your ability to track conversions and completely cut off your ability to build personalized remarketing lists. You will lose the ability to serve ads to past website visitors or cart abandoners.

💡 Summary: Basic vs. Advanced Consent Mode

  • Basic Mode: Google tags are completely blocked until the user hits “Accept”. If they click “Reject”, you get zero data, and Google has to use a broad, less accurate global model to guess your conversions.
  • Advanced Mode: Tags load immediately. If the user clicks “Reject”, the tags instantly switch to sending anonymous, cookieless pings. This gives Google the exact data it needs to build a highly accurate, advertiser-specific model tailored strictly to your website’s actual performance.
Zero Clicks SEO due to AI

0

In SEO, a Zero-Click Search happens when a user types a query into a search engine, finds the answer right there on the results page, and leaves without clicking on any website links.

Historically, this happened for simple things like checking the weather or converting currencies. However, with the explosion of AI Overviews and rich search engine result page (SERP) features, zero-click searches have turned into a massive structural shift. Data indicates that between 60% and 70% of all Google searches now end without a single click, particularly on mobile.

While this sounds like bad news for organic traffic, it has completely changed the rules of the game. SEO is transitioning from a “traffic-only” play to an “information and brand visibility” play.

What Triggers Zero-Click Behavior?

Google relies on several dynamic features to answer users instantly:

  • AI Overviews: AI synthesizes an answer pulled from multiple websites into a conversational paragraph right at the top of the screen.
  • Featured Snippets: The classic “Position Zero” text box that pulls a direct definition, list, or table from a site.
  • Knowledge Panels: The data boxes on the right side of the screen providing instant facts about public figures, brands, or places.
  • People Also Ask (PAA): Dropdown accordions that answer related questions inline.
  • Local Packs: Map and business listings that give users phone numbers and hours instantly, bypassing the company website.

How SEOs Are Adapting (The Playbook)

If users aren’t clicking through to your blog, how do you win? The strategy shifts from trying to hoard traffic to focusing on brand authority and AI citation.

1. Optimize for “AIO” (AI Overview) Citations

AI engines and search bots need to quickly parse your data to use it as a source.

  • Answer-First Structure: Put a clear, 1-2 sentence direct answer in your very first paragraph, then follow up with deeper context.
  • High Fact Density: Fill your content with proprietary data, unique case studies, and original statistics. AI cannot easily copy or synthesize unique, firsthand experiments from other places, making your site a primary source.

2. Double Down on Structured Data (Schema Markup)

By using heavy JSON-LD schema (Product, FAQ, Organization, LocalBusiness), you speak the search engine’s backend language natively. It explicitly tells the algorithm what your content means, making it highly eligible for rich results and accurate AI extraction.

3. Build a “Click-Resilient” Keyword Strategy

Segment your content based on search intent.

  • Accept Zero-Click for Top-of-Funnel: “What is…” or “Definition of…” keywords are going to lose traffic. Treat these purely as brand-awareness plays where your goal is just to have your logo or name cited in the AI block.
  • Target Bottom-of-Funnel (BOFU): Focus heavily on high-intent keywords that require a click. Users looking for “best CRM software pricing tool” or “buy leather boots near me” almost always click through to interact, buy, or use a tool.

4. Pivot to “Search Everywhere” Optimization

Since traditional search engine traffic is deflating, smart brands look to build visibility on platforms where users actively explore, such as YouTube (which is heavily cited by Google’s AI), TikTok, vertical directories, and email newsletters.

The Takeaway: Zero-click isn’t killing SEO; it’s forcing it to mature. Success is no longer just measured by website sessions, but by share of voice—ensuring that when an AI or search engine answers a user’s question, it uses your brand to do it.

The Content Strategy

When people in SEO talk about optimizing for AI Overviews (AIO) or Gemini, they don’t mean changing what you write—they mean changing how you format it so the LLM’s “scraper” can easily slice out a snippet and cite you.

This specific approach is called “Atomic Content Strategy” or Generative Engine Optimization (GEO). Instead of writing long, flowing essays, you design your pages to be a collection of modular, bite-sized answers.

The “Atomic” Content Blueprint

To ensure Gemini or Google AIO can easily clip your content into an overview, your articles should look like a series of distinct data blocks.

1. The “Atomic Answer” Block

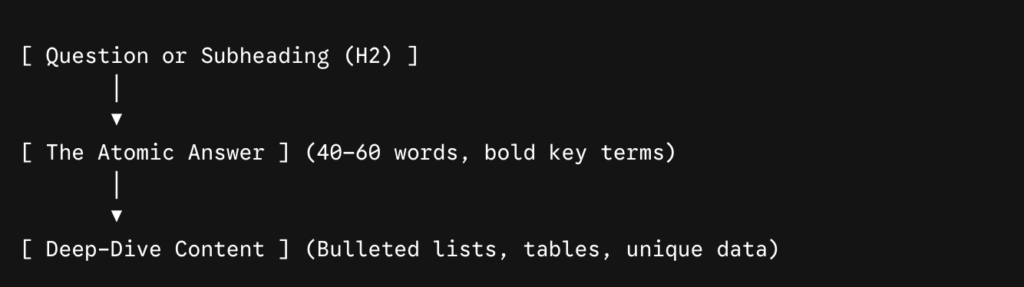
Right under an H2 or H3 heading, write a direct, concise 40-to-60-word paragraph that completely answers the question. Avoid fluff or introductory phrases (e.g., instead of writing “It is important to understand that…” just state the fact). AI models love pulling these standalone sentences directly into summary boxes.

2. Formatted List Blocks

AI Overviews rely heavily on bulleted or numbered lists because they are easy to display on mobile screens. If you are explaining a process, comparison, or set of features, always use formatting over prose:

  • Use bold text at the start of a bullet point to give the AI a clear anchor.
  • Keep list items short and punchy.

3. Data Tables for Direct Comparison

If someone searches for a comparison (e.g., Cost of Living in Berlin vs. Munich), an AI Overview will frequently pull a Markdown table directly from a site rather than attempting to generate its own from paragraphs of text.

Why This Strategy Works (Under the Hood)

Google’s system conducts dozens of mini-searches simultaneously to build an AI Overview, and it pulls heavily from the top 10 organic search results. When its web crawler reads a page, it looks for sections with high Information Gain (new, unique statistics or direct quotes) that are cleanly wrapped in semantic HTML (like <p>, <ul>, or <table>).

By building your content strategy around these snippet-ready blocks, you give the algorithm exactly what it needs to select your site as a trusted, cited source at the top of the page.

TV Advertising on Public Broadcasters such as ARD and ZDF

0

Because they are publicly funded by a mandatory license fee paid by German households, they are heavily regulated by the German Interstate Treaty on Broadcasting (Medienstaatsvertrag). They operate entirely differently from commercial networks like RTL or ProSieben.

If you plan to place a branding ad on ARD or ZDF, you must follow these rigid “rules of the game”:

1. The Hard Restrictions (The Law)

  • The 20:00 Dead Stop: Traditional commercial blocks are only allowed between 17:00 and 20:00 (8:00 PM) on Mondays through Saturdays. The exact moment the clock strikes 20:00, commercial advertising must stop completely.
  • Sundays and Holidays are Forbidden: You cannot run commercial spots on Sundays or national German holidays.
  • Strict Time Caps: Both networks are legally limited to a maximum annual average of 20 minutes of advertising per day.

2. The One Major Exception: Live Sports

The 20:00 hard stop rule has a massive loophole that is highly relevant for automotive branding: major international live sporting events.

When ARD and ZDF broadcast events like the FIFA World Cup, UEFA Euros, or the Olympic Games, they are legally allowed to broadcast advertising and sponsor placements after 20:00 during the event blocks. For example, during the 2026 FIFA World Cup, both networks introduced short commercial blocks during the official mid-half cooling/drinking breaks.

3. Program Sponsoring (The Loophole)

You have likely seen ads right before a popular show starts that say “This program is brought to you by [Brand].” This is called Sponsoring, and it is handled differently than classic commercial blocks.

  • Sponsoring clips are usually short (roughly 7 seconds) and can appear outside the strict 17:00–20:00 window.
  • They are highly regulated: the sponsor cannot issue a direct “call to action” or mention prices; it must be purely an image-based alignment with the show (e.g., a car smoothly driving through a landscape as the presenter introduces a premium evening movie).

The Strategic Pros & Cons for Automotive Branding

The Pros:

  • Unmatched Trust & Credibility: Germans view ARD and ZDF as premium, highly reputable sources. Aligning a brand with their content immediately elevates perceived prestige.
  • High-Income Older Demographics: The average viewer age skews older (50+). For an automotive brand selling premium, high-ticket vehicles, this is exactly the audience that has the disposable income to buy new cars.
  • Low Ad Clutter: Because blocks are short and limited to 20 minutes a day, your ad isn’t buried in a 10-minute commercial break like on private TV. Ad recall is statistically higher.

The Cons:

  • No Peak Prime Time Access: Missing the 20:00 to 22:30 sweet spot for regular entertainment shows hurts if you want maximum national reach for a younger audience.
  • Strict Ad Clearances: Their compliance teams are notoriously strict. If your car commercial makes environmental, fuel efficiency, or battery range claims, you will have to prove them with airtight data before they let the spot air.

How to Buy:

You buy ad spaces via their dedicated, separate commercial arms: ARD MEDIA GmbH (based in Frankfurt) and ZDF Werbefernsehen GmbH (based in Mainz). Standard non-sports rates vary from around €300 to over €900 per second depending on the exact minute and surrounding show.

TV Advertising in Germany

0

Placing a TV branding campaign in Germany involves navigating a highly structured market divided neatly between major private networks, public broadcasters, and a booming Connected TV (CTV) landscape. Because you are looking at this from an automotive context, targeting the right demographics and using the precise terminology of the German TV landscape is critical.

Here is the step-by-step process for executing a TV branding campaign in Germany.

Step 1: Choose Your TV Channels (The Network Landscape)

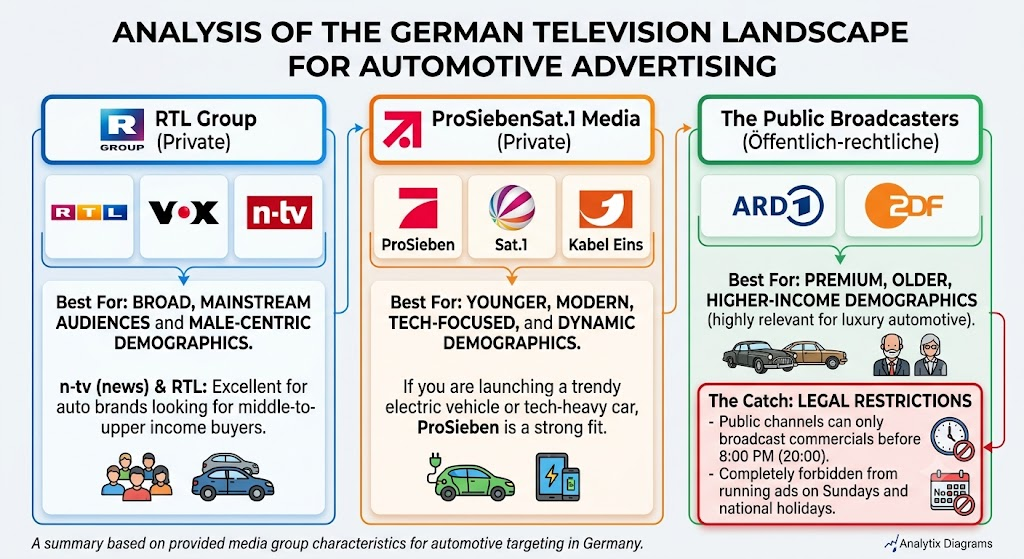
The German television market is consolidated into three major blocks. For an automotive brand, your audience will dictate which block you choose:

  • The RTL Group (Private): Channels include RTL, VOX, and n-tv.
    • Best for: Broad, mainstream audiences and male-centric demographics. n-tv (news) and RTL are excellent for auto brands looking for middle-to-upper income buyers.
  • ProSiebenSat.1 Media (Private): Channels include ProSieben, Sat.1, and Kabel Eins.
    • Best for: Younger, modern, tech-focused, and dynamic demographics. If you are launching a trendy electric vehicle or tech-heavy car, ProSieben is a strong fit.
  • The Public Broadcasters (Öffentlich-rechtliche):ARD and ZDF.
    • Best for: Premium, older, higher-income demographics (highly relevant for luxury automotive).
    • The Catch: By German law, public channels can only broadcast commercials before 8:00 PM (20:00) and are completely forbidden from running ads on Sundays and national holidays.

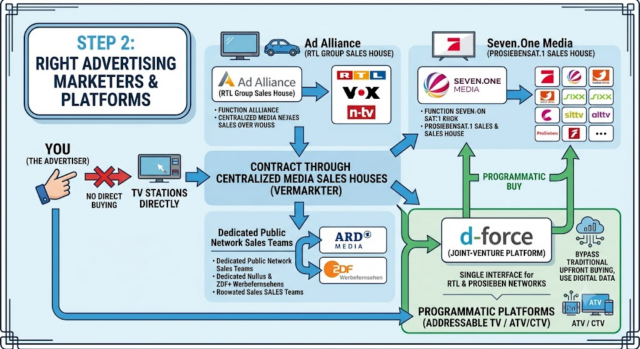
Step 2: Use the Right Advertising Marketers (Platforms)

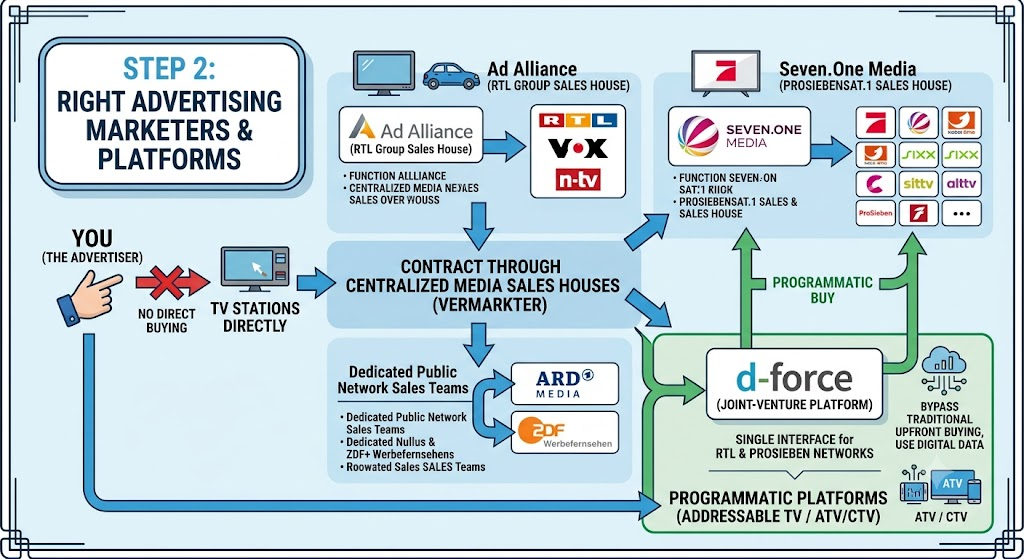
You do not buy ads directly from the TV stations themselves. Instead, you contract through centralized media sales houses (Vermarkter). You can buy traditional linear spots or use programmatic platforms for Addressable TV (ATV/CTV):

  • Ad Alliance: This is the sales house for the RTL Group. If you want to buy ads on RTL, VOX, or n-tv, this is who you deal with.
  • Seven.One Media: The sales house for all ProSiebenSat.1 channels.
  • ARD MEDIA & ZDF Werbefernsehen: The dedicated sales teams for the public networks.
  • d-force: If you want to bypass traditional upfront buying and run Addressable TV (ATV) using digital data, d-force is a major joint-venture platform in Germany that lets you programmatically buy ad space across both RTL and ProSieben networks using a single interface.

Step 3: Select Your Placements and Times (The Broadcast Windows)

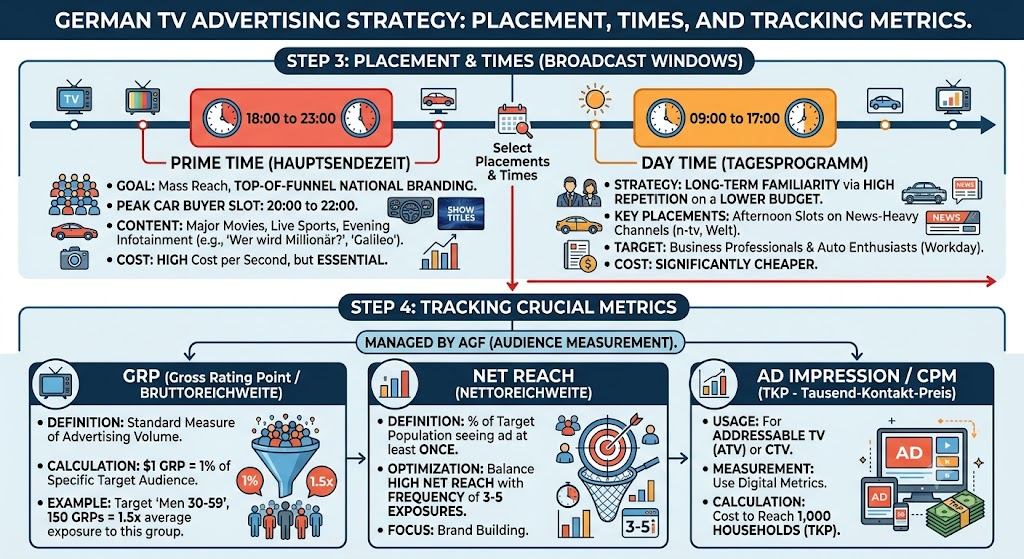
German TV rates are heavily tied to the time of day, categorized into two main windows:

Prime Time (Hauptsendezeit): 18:00 to 23:00

This is where you get mass reach. The absolute peak for car buyers is 20:00 to 22:00, specifically during major movies, live sports, or popular evening infotainment shows (like Wer wird Millionär? on RTL or Galileo on ProSieben).

  • Cost: High cost per second, but essential for top-of-funnel national branding.

Day Time (Tagesprogramm): 09:00 to 17:00

Significantly cheaper.

  • Strategy: If you are looking to run highly repetitive ads to build long-term familiarity on a lower budget, afternoon slots on news-heavy channels like n-tv or Welt catch business professionals and auto enthusiasts during the workday.

Step 4: Track the Crucial Metrics

Unlike digital PPC where you track clicks and instant CPAs, German TV branding relies on specific audience measurement metrics managed by AGF (the organization that tracks German TV viewing figures).

  • GRP (Gross Rating Point / Bruttoreichweite): The standard measure of advertising volume. $1\text{ GRP} = 1\%$ of your specific target audience. If your target is “Men aged 30-59” and your ad achieves 150 GRPs, you’ve theoretically exposed that demographic to your ad 1.5 times on average.
  • Net Reach (Nettoreichweite): The percentage of the target population that saw your ad at least once. For branding, you want to optimize for a balance of high net reach and a Frequency (Kontakte) of 3 to 5 exposures.
  • Ad Impression / CPM (TKP – Tausend-Kontakt-Preis): If you opt for Addressable TV or CTV, you will measure performance using digital metrics—specifically the cost to reach 1,000 households (TKP).

Step 5: The Step-by-Step Buying Flow

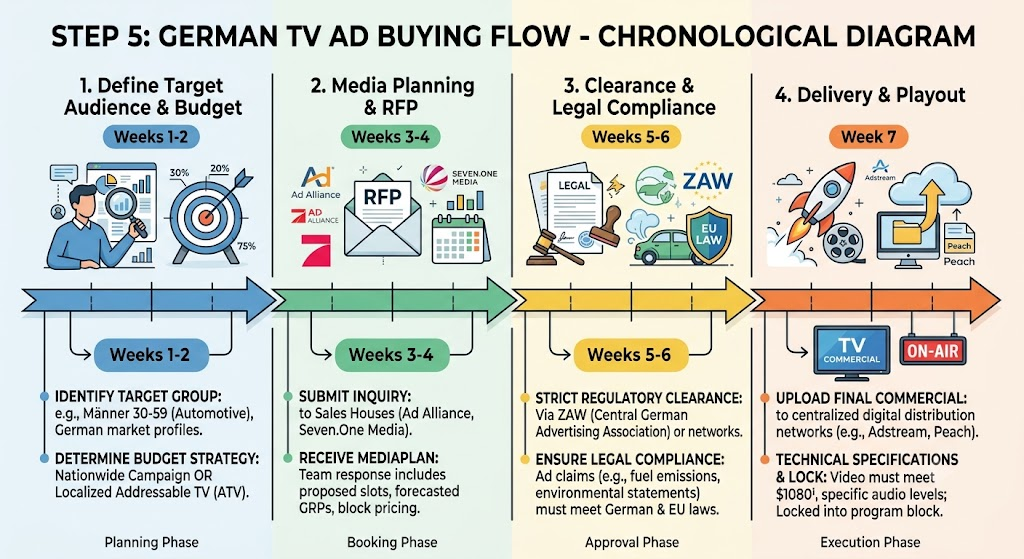
1.Define Target Audience & Budget:Weeks 1-2.

Identify your target group based on German market profiles (e.g., Männer 30-59 for automotive). Determine if your budget supports a nationwide broad campaign or a localized Addressable TV campaign.

2.Media Planning & RFP:Weeks 3-4.

Submit an inquiry to Ad Alliance or Seven.One Media. Their teams will send back a Mediaplan mapping out proposed ad slots, forecasted GRPs, and block pricing.

3.Clearance & Legal Compliance:Weeks 5-6.

In Germany, all broadcast ads must pass strict regulatory clearance via the ZAW (Central German Advertising Association) or the networks’ legal compliance teams. This ensures your automotive claims (e.g., fuel emissions, environmental statements) comply with strict EU and German laws.

4.Delivery & Playout:Week 7.

Upload the final produced commercial to a centralized digital distribution network like Adstream or Peach. The video must meet strict broadcast technical specifications ($1080\text{i}$, specific audio loudness levels). The sales house then locks it into the program block.

Walled Gardens

0

In digital advertising, a walled garden is an ecosystem where the platform operator has total control over the user data, the ad tech, and the performance reporting. They allow you to buy ads, but they do not let you export the raw user-level data outside of their “walls.”

You have to trust the data they give you inside their dashboard.

The two biggest walled gardens in marketing are Google (Paid Search/PPC) and Meta (Social Media—Facebook & Instagram). They handle data and cross-platform tracking completely differently, which explains why social media often yields a higher, more frustrating Cost Per Acquisition (CPA) compared to PPC.

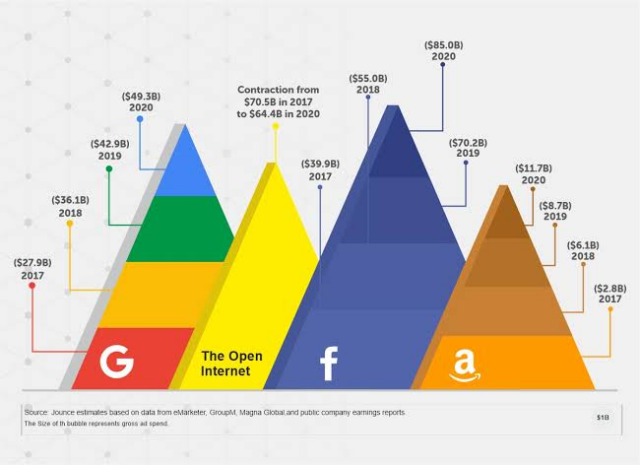
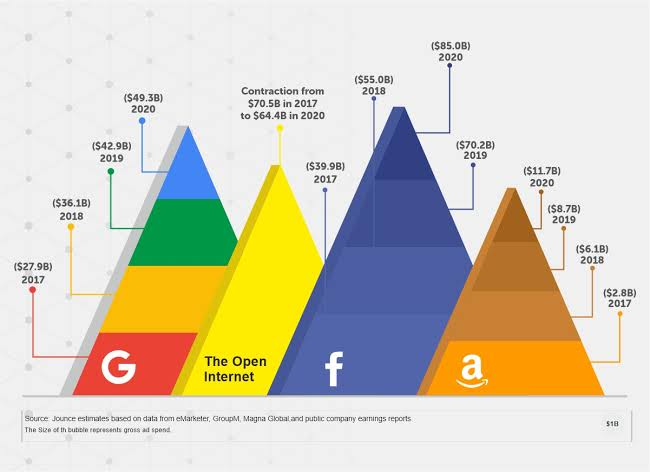
The Open Web vs. Walled Gardens

To understand the problem, look at how massive tech monopolies dominate ad spend compared to independent websites:

1. Google PPC (Paid Search): The High-Intent Garden

Google dominates search intent. Because people use Google to actively look for answers, tracking them down the funnel has historically been much more linear.

  • How data works inside this garden: When a user types a query like “best lease deals near me,” they have immediate intent. They click your text ad, land on your website, and fill out a lead form.
  • Why it feels easier to measure: Because the conversion happens directly on your website after a deliberate keyword search, the link between the click and the action is tightly knit. Even inside Google’s garden, it’s easier to verify that a Paid Search click led to a direct sale.

2. Meta (Facebook & Instagram): The Passive-Browsing Garden

Meta relies on user identity, interests, and behavior. Nobody logs onto Instagram to buy a car; they log on to look at photos, reels, and updates.

  • How data works inside this garden: Meta tracks users meticulously inside its own apps. It knows exactly what type of car videos a user pauses on. When you run an ad, Meta targets that specific identity profile.
  • The Tracking Blindspot: The trouble starts the moment a user clicks your Instagram ad and leaves the app to visit your website. Since Apple introduced iOS 14.5 (allowing users to block app tracking), Meta’s ability to “see” what that user does on your third-party website has been severely broken.

Why Walled Gardens Pit PPC against Social Media (The Attribution War)

Because Google and Meta do not share user data with one another, they both try to take 100% of the credit for the exact same sale. This creates massive headaches for determining an accurate CPA.

Imagine a typical 3-step customer journey for someone buying a car:

Step 1: User sees a beautiful video ad of an SUV on Instagram. They don’t click, but they watch it.
Step 2: Two days later, they remember the SUV, go to Google, and search for the local dealership (PPC).
Step 3: They click the Google PPC ad, visit the site, and submit a lead form.

The Measurement Discrepancy:

  • Meta’s Dashboard says: “Our Instagram ad worked! We deserve credit for a view-through conversion.” Meta counts this as a win, driving down your apparent “Social CPA” inside its platform.
  • Google’s Dashboard says: “Our Search ad caught them! We deserve credit for a last-click conversion.” Google counts this as a win inside its own platform.
  • Your CRM / Analytics says: You only sold one car, but your ad dashboards claim you sold two.

Because Meta’s walled garden forces it to rely heavily on statistical modeling and “view-through” data (claiming credit just because someone saw an ad), its reported data often looks vastly inflated.

When you strip away the platforms’ self-reported dashboards and look strictly at hard CRM data (actual store leads), Meta’s real, verified direct CPA regularly outpaces PPC. This is exactly why, as you noted, relying on social media for direct-response lead generation usually costs more than catching a buyer who is actively searching on Google.

Social Media Marketing and Cost Attribution

0

Social Media Marketing and Cost Attribution

Is heavy investment in Paid Social justifiable for marketing outside of brand awareness? Because of ‘walled gardens’ in data analytics, tracking an accurate CPA is highly complex, and visible CPAs for Facebook and Instagram consistently outpace PPC. I typically advise scaling back social ad spend for this reason—do you agree, or are there attribution frameworks that prove otherwise ?

The “Intent Gap” (Why PPC Wins hands down)

The core reason PPC (Google Search, Google Shopping, Bing) outclasses Social Media in automotive is search intent.

  • PPC: When someone types “used Volkswagen Golf automatic Berlin” into Google, they have a credit card in hand and a high intent to buy. You are paying for a highly qualified lead at the exact moment of decision.
  • Social Media: People go to Instagram and Facebook to look at memes, vacation photos, or news. When you show them a car ad, you are interrupting them. Even if they click because the car looks nice, they are usually months away from actually buying.


2. The Walled Garden & Attribution Nightmare

The attribution problem. Ever since Apple’s iOS 14 update and the ongoing death of third-party cookies, Meta’s (Facebook/Instagram) tracking pixel is notoriously unreliable for high-ticket items ( Customers don’t just click “buy now.” They require a much longer deliberation period, extensive research, and a high level of trust in the brand before purchasing high cost products ).

  • Meta loves to claim “View-Through Conversions” (e.g., “This user bought a car on your website, and they happened to scroll past our Instagram ad 6 days ago, so give Meta the credit!”).
  • In reality, if we look at the internal CRM or Google Analytics, that customer almost always came through Direct traffic, organic search, or a Google PPC ad. Meta’s Cost Per Acquisition (CPA) often looks artificially cheap in their own dashboard, but when you look at bank-account-level data, the real CPA is sky-high compared to PPC.

3. When Should Brands Use Social Media?

If the conversion CPA is so bad, why do companies still spend millions on Meta? Let’s have a look at an example from the automotive industry, they use it strictly for two specific use cases:

  • Top-of-Funnel Branding (Trust Building): Buying a car online is terrifying for most people. Social media is great for showing video testimonials, behind-the-scenes vehicle inspections, and influencer reviews. It doesn’t sell the car today, but it makes the user trust the brand so that three weeks later, when they search on Google PPC, they click your ad instead of a competitor’s.
  • Dynamic Retargeting (The Only Direct-Response Exception): If a user goes to the car seller website, looks at a specific 2022 BMW 3-Series, and leaves, using Meta to show that exact car to them on their Instagram feed the next day actually has a very strong ROI.

The Verdict for Budget Attribution

If your goal is short-term sales volume at the lowest possible CPA, the strategy should be:

  1. Max out your PPC search budget first. Do not leave any high-intent Google search demand on the table.
  2. Move Social Media strictly to a “Retargeting & Branding” bucket. Cap your social media spend at a small percentage of your total budget (e.g., 10–15%) just to keep your retargeting ads alive and maintain brand presence.

If a marketing agency or team member tries to push for a massive Facebook/Instagram prospecting budget, demand that they prove the CPA using a closed-loop CRM match (matching actual car sales data to Meta user IDs) rather than relying on Meta’s flawed dashboard metrics.

Fixing SSH Locale Warnings on macOS / Debian

0

. The Problem

When connecting to a Linux VPS (Debian/Ubuntu) via SSH from a macOS Terminal, the following warning repeatedly appears upon login:

-bash: warning: setlocale: LC_CTYPE: cannot change locale (UTF-8): No such file or directory

Why it happens:

  • The Mac Side: By default, the macOS Terminal application is configured to force local language and character environment settings across the network to any server we connect to. It specifically tries to inject an environment variable called LC_CTYPE="UTF-8".
  • The Server Side: Debian expects locale variables to follow a strict standard format that includes both language and region (e.g., de_DE.UTF-8 or en_US.UTF-8). When macOS sends just "UTF-8", Debian looks for a language pack named exactly UTF-8. Because it doesn’t exist, the server throws a warning for every interactive shell process it tries to start.

2. The Solution

To fix this, we have to stop macOS from aggressively pushing incomplete locale environment variables through the SSH connection.

Step-by-Step Resolution:

  1. Disconnect from the remote VPS server.
  2. Open the macOS Terminal app locally.
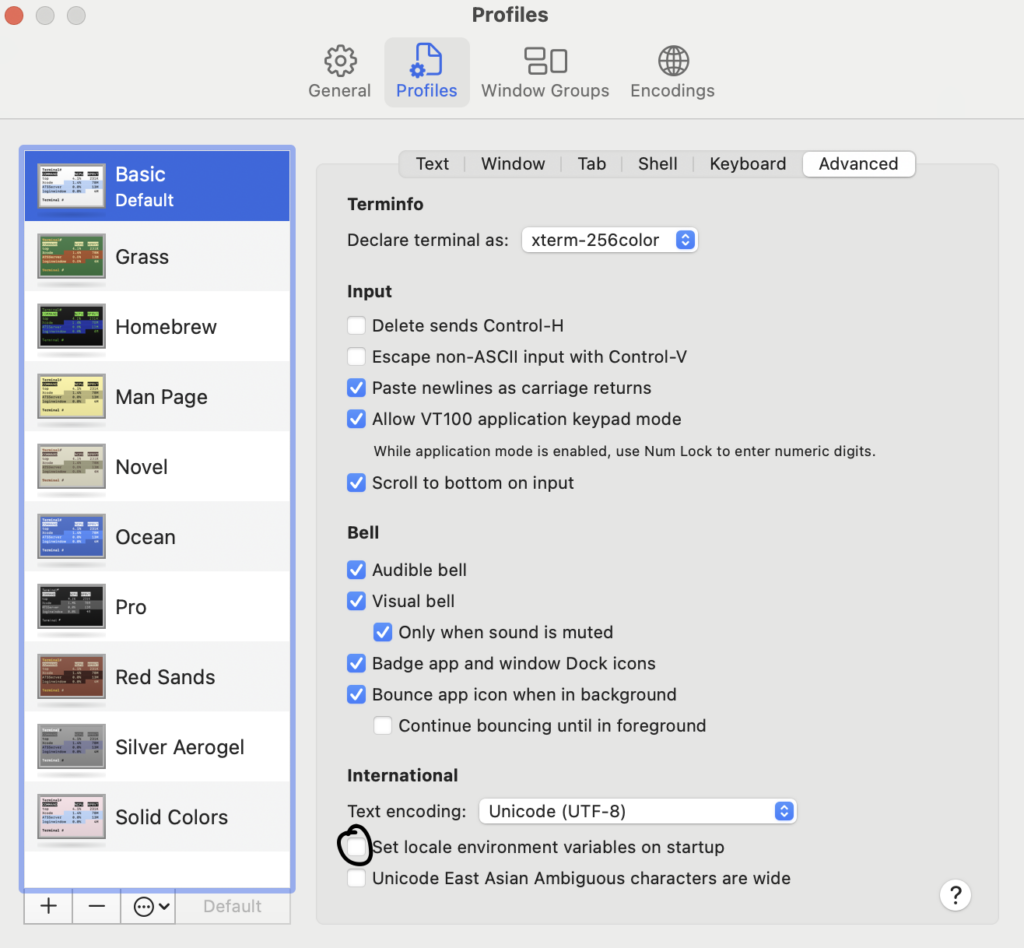
  3. In the top macOS menu bar, navigate to Terminal > Settings… (or Preferences… on older macOS versions).
  4. Click on the Profiles tab at the top of the settings window.
  5. Select the Advanced sub-tab on the far right.
  6. Locate the checkbox labeled: “Set locale environment variables on startup”.
  7. Uncheck this box.
  8. Restart the Terminal application and reconnect to the VPS.

3. The Result

  • No More Warnings: The server no longer receives the invalid UTF-8 variable from the Mac, eliminating the startup warnings completely.
  • Keyboard Layout Intact: The local German keyboard layout (ä, ö, ü, ß) continues to function perfectly over SSH because keyboard inputs are handled by the terminal emulation layers, independent of the environment variables.

Executed Commands

1. Commands Run on the VPS (Debian Server)

Before adjusting the Mac settings, I verified and updated the server’s supported language packs so it could properly recognise German character mapping. My Macbook has a German keyboard, therefore when I connect over ssh to my VPS, I need to tell my VPS that I am loging in with a German keyboard.

  • sudo dpkg-reconfigure locales

Purpose: This opens an interactive menu to install specific language environments (like de_DE.UTF-8 and en_US.UTF-8) directly onto the Debian system operating system.

2. Commands for the Local Machine (Macbook Pro)

While I ultimately fixed the issue using the macOS Terminal GUI settings, the core configuration file that controls how SSH handles these environment variables on Unix-based clients, I also needed to update the same setting on my Macbook.

To edit the global SSH client configuration:

Step-by-Step Resolution:

  1. Disconnect from the remote VPS server.
  2. Open the macOS Terminal app locally.
  3. In the top macOS menu bar, navigate to Terminal > Settings… (or Preferences… on older macOS versions).
  4. Click on the Profiles tab at the top of the settings window.
  5. Select the Advanced sub-tab on the far right.
  6. Locate the checkbox labeled: “Set locale environment variables on startup”.
  7. Uncheck this box.
  8. Restart the Terminal application and reconnect to the VPS.

Resolving the Static index.html vs. WordPress Conflict

0

If you have recently launched a website on a hosting environment (like KeyHelp) and found yourself staring at a default placeholder or a blank static page instead of your active WordPress site, you are not alone. This is a very common architectural issue that occurs when server file defaults collide.

Here is a look behind the scenes at why raymendis.com was showing a static HTML file, how web servers decide what to display, and exactly how we fixed it.

The Core Issue: File Precedence

When a web browser requests a domain name, the web server (such as Apache or Nginx) must choose which specific file in your root folder to load first. It determines this using an internal priority list known as the Directory Index Hierarchy.

By default, almost all web servers prioritize static HTML files over dynamic PHP script files. The standard lookup order looks like this:

  1. index.html (Highest Priority)
  2. index.htm
  3. index.php (WordPress Core Engine)

When WordPress is installed, it drops its core configuration files into your directory, spearheaded by index.php. However, hosting environments like KeyHelp automatically generate a default, temporary index.html “Welcome” page when a domain is first set up.

Because the web server found the index.html file first, it stopped looking further down the list. Your WordPress site was sitting there perfectly healthy the entire time, but it was being blocked by the higher priority of the static HTML page.

The Action Plan: How We Fixed It

To fix this, we had to change the layout of the directory or the behavior of the server so that WordPress could take center stage. There are three ways to address this issue:

Method 1: Deleting or Renaming the Obstacle (Fastest & Cleanest)

Since the temporary placeholder page is no longer needed once a real website is ready, the easiest fix is to completely remove it.

  1. Log into the KeyHelp control panel and navigate to Tools > File Manager (or connect via an FTP client like FileZilla).
  2. Go to the primary directory of your website (usually found under www/raymendis.com/).
  3. Locate the file named exactly index.html.
  4. Delete it, or rename it to something like old-index.html to take it offline.

With that file out of the way, the web server drops to the next priority on its list, instantly finding and loading WordPress’s index.php.

Method 2: Rewriting Server Priorities via .htaccess

If a server configuration requires you to keep the index.html file in the folder without it overriding WordPress, you can change the server’s rulebook locally.

  1. Open your root website directory and locate the hidden file named .htaccess.
  2. Edit the file and insert this exact line at the very top:

This explicitly tells the server to look for the dynamic PHP file before attempting to look for an HTML file.

Method 3: Verifying the KeyHelp Root Directory Directory

If deleting the file leads to a “404 Not Found” error instead of a working website, it means the WordPress files are sitting in a subfolder. Many one-click script installers place WordPress inside a secondary folder (like /wordpress/) instead of the main root folder.

  1. In KeyHelp, head over to Domains.
  2. Click the Edit (pencil icon) next to the domain name.
  3. Check the Target directory field and ensure that the folder path points precisely to where your core WordPress files (wp-config.php, wp-content, etc.) are stored.

⚠️ A Note on Browser Caching

Web browsers aggressively cache static .html files so they load faster on repeat visits. After applying any server-side fixes, the static page may still appear to you. If this happens, you need to perform a Hard Refresh (Ctrl + F5 on Windows or Cmd + Shift + R on Mac) or open your site in an Incognito/Private window to clear out the old session data. Your beautiful, dynamic WordPress site will load right up!

💡 Tip for Publishing on WordPress:

  • You can copy and paste the text above into your editor using standard Paragraph, Heading, and Code blocks.
  • If you want to use a summarized callout box at the top or bottom of your post, use a WordPress Group block with a light background or a Quote block with this text:
 Quick Fix Summary: If your new WordPress site shows a generic placeholder page or static HTML screen instead of your actual blog, it is caused by web server file priority. Servers automatically load index.html before they look for WordPress's index.php. To fix it instantly, simply open your server's File Manager, locate your website's main folder, and delete or rename the index.html file. Once removed, perform a hard refresh on your browser, and your live dynamic WordPress site will load up perfectly!

Resolving Missing SSL Certificate on a “www” Subdomain in KeyHelp

0

The Problem

When I encountered a “Not Secure” warning with the web browser, with a crossed-out https:// protocol specifically when trying to access my website via https://www.raymendis.com, I noticed that the bare domain (https://raymendis.com) was still loading securely without any issues.

The Cause

After logging into my KeyHelp administration panel on my Debian VPS, I realized that KeyHelp treats the root domain and the www subdomain as two separate entries in the domain list. While I had already activated the Let’s Encrypt SSL certificate and HTTPS redirection for the root domain, the security settings for the www subdomain entry were completely unconfigured and blank. Because there was no certificate assigned to the www variant, the browser flagged it as insecure.

The Solution

To fix this, I manually enabled the Let’s Encrypt certificate for the specific subdomain entry inside KeyHelp using these steps:

  1. Located the Subdomain: In the KeyHelp Domains control panel overview, I found the www.raymendis.com row and clicked the Edit (pencil icon) on the far right.
  2. Activated Let’s Encrypt: I went to the domain’s Security tab and selected the Let’s Encrypt certificate radio button.
  3. Enforced HTTPS: I checked the Enabled box under Enforce secure connection to ensure any regular HTTP traffic automatically upgrades to secure HTTPS.
  4. Saved the Changes: I clicked Save at the bottom of the page.

Within 1 to 2 minutes, KeyHelp automatically provisioned the new certificate and reloaded my web server. Both my root domain and the www subdomain now show the green HTTPS badge in KeyHelp and load perfectly in the browser without any warnings.

AI

0

Test

Popular Posts

My Favorites

Resolving the Static index.html vs. WordPress Conflict

0
If you have recently launched a website on a hosting environment (like KeyHelp) and found yourself staring at a default placeholder or...

Google Consent Mode